Pages

Sunday, May 11, 2014

Easy Jerk Chicken At Home

The Ultimate Oven Jerk Chicken.


oven jerk chicken (7)
A bit of a bold statement and I’m sure my Jamaican friends are scratching their heads pondering why this “Trini” making such bold claims. One taste of this succulent jerk chicken after it comes out of the oven and you’ll know why it’s an “Ultimate” dish. Following on the other “Ultimate” recipes I’ve shared in the past, this one will not disappoint (search “Ultimate” on the right side of the page to see the other recipes in this category).
Yes, traditional jerk is made on the grill with pimento wood as it’s base of flavor and while you can’t duplicate this in the oven, this one is very convenient for people who don’t have a grill or live in northern climates and have to deal with bitter cold winters. Personally a little snow and minus degree temperatures can’t keep me away from my grill, but lately I’ve found that I don’t brave the outdoors as much as I used to in the winter.
NOTE: For the marinade for this you’ll need to refer to:  A Classic Jamaican Jerk Marinade.
You’ll Need…
6 chicken legs (with back attached) about 4-5 lbs
1 lemon or lime (or 1/4 cup vinegar)
1 cup Jerk Marinade
Tip: Line your baking dish with aluminum foil to make the clean-up after easier.
Trim off the excess skin and fat off the chicken (but leave most of the skin – you can remove it later before eating), then pour the lime or lemon juice (or vinegar) over the trimmed chicken. Then rinse off with cool water and drain. Now take a pairing knife or fork and pierce the chicken pieces. This will allow the marinade to penetrate the meat and really “juice” it up. Now you’re set for marinating the chicken. In a zip lock bag or bowl with a lid, pour the jerk marinade and mix everything well. Now seal and place in the fridge for at least 2 hours. I used a large baking dish, which I sealed with plastic wrap. This way when I’m ready, it can go directly into the oven.
oven jerk chicken (2)
oven jerk chicken (3)
oven jerk chicken (4)
After 2 hours take it out of the fridge and pour everything (including all the marinade) into a baking dish and let it come up to room temperature while you oven heats up. I had mine marinating in the baking dish already, so I was good to go.
Preheat your oven at 375 degrees.
Place the baking dish with the chicken on the middle rack and allow this to cook for about 1 hour and 20 minutes. The chicken should be cooked after that, so if you want to add some rich colour to the finished dish, you may need to turn on your broiler for a few minutes.
oven jerk chicken (5)
oven jerk chicken (6)
oven jerk chicken (7)
If you want you can place some aluminum foil over the dish the first 30 minutes of cooking, but I find that leaving it exposed (open) works great. While this cooks in the oven your home will be blanketed with the lovely scent of rich Caribbean spices and herbs and you’ll be counting down the minutes until you can devour a succulent piece of the Ultimate Oven Jerk Chicken. Here I have it served with some rice and creamy coleslaw. BTW, the sort of sweet and creamy flavours of the coleslaw complements this jerk chicken wonderfully

Thursday, May 1, 2014

Chinese Vermicelli.. Lets Cook

Homestyle stir fried rice vermicelli (chow mee hoon) 家常炒米粉


Rice vermicelli 米粉 (mee fun, mee hoon or fine rice noodles) can be a pain to stir fry. If anyone finds rice vermicelli always clump together, broken into bits and sticking to the pan/wok, you may find this post useful.

To make delicious stir fried rice vermicelli, there are a few rules to follow.
  • the noodles must be soaked with cold or lightly warm water, never use boiling water.
  • noodles must not be over soaked.
  • unless you pan or wok is guaranteed non stick with whatever you throw into it, one must not stir fry the noodles together with the vegetables or meat or you will find the noodles stick very quickly to the pan or wok.
Here is picture to show the noodles are nicely separated and not broken at all using this method.


Below is the recipe how I normally do it if you like to give it a try. You can use various different vegetables and meat/prawns you have at hand. I always add egg to fried noodles.

Other vegetables can be used are woodears, shitake mushroom, pak choi, Chinese cabbage, onion, leeks, Sichuan preserved vegetable (zha chai), jicama (mungkuang), fresh green beans. All vegetables to be shredded quite fine.

For a vegetarian version, can sub meat and egg with fried or super firm tofu or seitan


Stir fried rice vermicelli


Ingredients:

This qty makes a big plateful, enough for 3 - 4 people generously.

250g dried rice vermicelli or mee hoon (I like the superfine type, you and use any type you like)

2 large eggs, beaten

3 - 4 cloves garlic chopped
about a third cup minced (ground) pork, beef, chicken or roughly chopped prawns
about a third to half cup sliced/shredded Chinese sausage (lap cheong), ham any type or bacon, for non pork eater can use Chinese fried fish cake or leftover roast beef, chicken or lamb or peeled cooked prawns
1 medium carrot shredded (I used the mandoline)
about 4 leaf of cabbage, finely shredded (about 1.5 cup)
about 1.5 cup beansprouts
about 3 - 4 stalks of spring onion (scallion), chopped
few tbsp light soy sauce, to taste
1 tsp of chicken stock granules/bullion (optional)
some ground pepper.

cooking oil


Method:
  1. Soak the dried noodles with cold or lightly warm tap water till soften. Drain with colander and shake the noodles to release as much water as you can. Leave aside for 10 minutes before stir frying.
  2. Prepare the other ingredients.
  3. When wok is hot add about 1 - 1.5 tbsp oil, spread oil around the wok. When almost smoking hot, add in the egg spread it evenly to form a thin omelette. Brown on one side, flip over and break the omelette into small bitesize. Remove and set aside.
  4. Add about 1.5 tbsp of oil in wok, when wok is really hot add half the chopped garlic follow by the noodles. Stir and toss with chopsticks, to loosen and stir fry till noodles are hot. Drizzle on some light soy while stirring to evenly mix soy with noodles. Stir till noodles are cooked through and hot. Remove and set aside.
  5. Add more oil in wok (about 1.5 tbsp) and the remaining garlic. Stir then add meat/prawn and lap cheong or bacon (if using cooked meat, fish cake or prawns, add in a little later till raw meat is cooked. Stir till meat is cooked and fragrant. Add dash of light soy.
  6. Add cabbage and carrot, stir till vegetables are soften. Add more soy and chicken stock granules to taste. Can add a little water to create steam to cook the vegetables. When vegetables are soften add beansprouts. Stir briefly.
  7. Add in omelette, stir briefly.
  8. Turn off heat. Add in spring onion and noodles. Add ground pepper. Tease and toss the noodles, so the noodles are loosen and mix evenly with the vegetables, meat and egg. When done, if noodles are somewhat cooled down, turn the heat on, tossing the noodles while stirring. Heat till noodles are hot or when starting to stick to the pan/wok turn heat off. Ready to eat.

Wednesday, April 9, 2014

My veggies may live this year :)

Ok I found this awesome group that is helping me grow my veggies this year. I will say last year that it did not go so well.They died a horrible horrible death. These people are so awesome so I will link their site and you guys check it out. The Easy Garden  and they are so nice and helpful. I know we went off track with recipes but what is a recipe without good veggies. 


I will post pictures soon of how my garden is progressing and hopefully we see some soon. So excited about this and thankful I found that group.

Sunday, April 6, 2014

How to Home Garden - Growing your own vegetables

I have recently started my own garden in my apartment to grow vegetables to cook with. Last year did not go so well putting them on patio with the weather fluctuating so much. Here are some pictures of the vegetables I am planting so far. They should be about 3 weeks going now.


I started with Cucumbers, bell peppers, habaneros, and jalapenos. Not sure how well they will go but I love fresh vegetables. The cucumbers if you cant tell I just put around some skewers found in the kitchen because they were looking sad laying in the pot. Any suggestions are welcomed. If this doesn't work, I have more veggie seeds waiting. I would love to do some cabbage.


I put the pots in my guest bathroom on counter under the lights since I can't really afford grow lights. Seriously excited about having things grow.


Thursday, March 20, 2014

Southern Lemon Cake


Ingredients:

3 cups cake flour
1 1/2 teaspoons baking powder
1 teaspoon baking soda
1 teaspoon ground ginger
1/2 teaspoon salt
3/4 cup unsalted butter, softened
2 cups sugar
4 large eggs; separated, at room temp
2 tablespoons lemon juice, fresh
1 teaspoon vanilla
1 1/3 cups buttermilk
1/4 teaspoon cream of tartar
.
Frosting
8 ounces cream cheese, softened
3/4 cup unsalted butter, softened
2 cups confectioners' sugar, sift before measuring
1/4 cup heavy cream
1/3 cup lemon curd, purchased
.
Filling
1 cup lemon curd, purchased
Preparation:

Cake - preheat oven to 350°. Grease and flour two 9-inch round cake pans or spray with nonstick baking spray with flour. In large bowl, combine flour, baking powder, baking soda, ginger, and salt. Sift into another large bowl. In large bowl, beat butter and sugar at medium speed 2 minutes, until fluffy. Beat in egg yolks, one at a time, beating well after each. Beat in lemon juice and vanilla. At low speed, beat in flour mixture alternately with buttermilk, beginning and ending with flour mixture (about 4 flour additions and 3 buttermilk additions). Beat just until blended. In small glass or metal bowl with clean beaters, beat egg whites with cream of tartar until stiff peaks form. With rubber spatula, gently fold egg white mixture, in thirds, into batter. Spread batter in prepared pans. Bake 35 to 40 minutes, until cake tester inserted in centers comes out clean. Cool in pans on racks 10 minutes Invert onto racks. Cool.
Make frosting. In large mixing bowl, beat cream cheese and butter 2 minutes, until fluffy. At low speed, beat in confectioners sugar, cream, and lemon curd until smooth. Cover; chill 20 minutes, until spreadable consistency.

Using serrated knife, level tops of layers if necessary. Place 1 layer on serving plate; spread with lemon curd. Refrigerate for about 15 minutes to set the lemon curd. Top with remaining layer. Frost cake; refrigerate. Bring cake to room temperature for serving. Garnish with fresh berries or candied lemon slices, if desired.

Tuesday, March 18, 2014

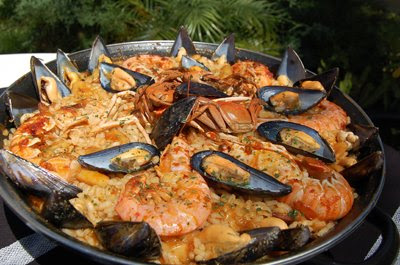
Paella Done Right


From Spanish Recipes by Nuria.

Special dressing: Phil Collins with Paradise (turn player on).

Spanish Paella is probably one of our most famous dishes worldwide. It all started inValencia, a beautiful Spanish region also known for its savory oranges.
This post pretends to be a guide for all of you who have never tried cooking this dish and would love to try it… I’m not saying this is the original way to cook it, even the gastronomes think that every Spanish region has adapted the dish to the ingredients they have in each region.
So, this is one of my interpretations of Seafood Paella. Feel free to use your own food regional ingredients, just be sure to follow these simple Basic Rules:
  • Use a proper sauce pan. If you don’t have a paella (name of the specific pan to do this dish) a new Teflon one would be ok, just make sure it’s not deep.
  • Always use fresh ingredients. The fresher the better results you will achieve.
  • It’s always preferable to cook your own stock and to cook your own sauces (a canned tomatoe fried sauce would be ok but if you have the time make your own).
  • The rice should be Bomba or Bahía, their properties are perfect for the absorption of the dish juices.
  • Be patient when cooking the sofrito! Sofrito is the soul of the paella, if you cook it properly half the way to success is done.
  • The proportion rice/stock is very important! 2 water glasses of rice/5 water glasses of stock. Depending on your stove heat and type of rice this could vary. Just keep the stock boiling so that you can add a bit more if necessary.
I have made paella so many times that I do it by heart and never write down the exact measures but this time I made sure to write everything down so that you could follow all steps and get the best result!

Ingredients for 4 servings: 500 grs of fresh mussels, 4 fresh shrimps, 4 fresh prawns, 8 fresh small crabs, 1 fresh cuttlefish, 1 medium onion, 1 garlic clove, 5 ripe tomatoes, olive oil (0,4º), salt and fresh parsley. Also for the fish stock: another onion, 1 ripe tomatoe and 2 garlic cloves.
Purists insist that Paella shouldn’t have onion in its sofrito… but I love it with onion! Feel free to change that.
First of all get the mussels and stock ready: Clean your mussels and have inside a pot with cold water (half centimeter), cover the pot. Turn heat on and when they open reserve. Keep their water too. The ones that don’t open, discard.
 
Have your fresh ingredients clean and ready to be used: the cuttlefish (ask your fishmonger to clean it for you), take skin off , wash and dry, have the crabs in a place where they cannot scape (mine tried hard… poor little ones), wash the shrimps and keep fresh.
 

Start your fish stock with the following: Prepare a deep pot with 5 tablespoons of olive oil, turn heat on (low), add the ripe tomatoes cut in pieces, add the chopped onion and the minced garlics. Stir for 5 minutes, add a sprinkle of salt and let all flavours mix. Add the crabs and turn heat to medium. Sautee with the veggies. Keep on stirring until crabs turn red. Add 3 litters of water to the pot and boil for 20 to 30 minutes maximum.
There will probably be some stock left, use it to make a soup or just keep it for the next paella :D. This time I chose the crabs for the stock but feel free to use any white fish or just bones to do it. The crabs flavour is wonderful here though!

With the crabs stock and the mussels juices make a mixture that fits your palate. If you use the mussels water notice that is very salty and then you might not add more salt to your paella. Or just use the crabs’ stock… or the mussels water… whatever you prefer. This time I used the crabs’ stock mixed with a bit of mussels water.
Take your paella and add 4 to 5 tablespoons of olive oil. Turn heat to medium and place the cuttlefish cut in small pieces. Stir until golden.
Add the onion to the paella finely chopped and stir until golden. Here is the beggining of the sofrito. A very important part of the Paella.

Then add the tomatoes you’ve grated into the pan and stir.
The heat should be medium/low and you will see that the tomatoe kind of disappears and the sauce becomes darker and more oily. This could take from 30 to 45 minutes, even 60, the lower the heat the more time it takes but the better results too.
It’s time to add the shrimps to the paella, have for 1 minute maximum, keep on stirring and reserve aside.
This is a close up of how the sofrito should look like. When it gets to this point… it’s done! Keep the heat the lowest possible and get your fish stock ready.
Back to the fish stock, safe 3 or 4 crabs away, put the rest in a mortar and smash so that they get all juices out. Pour a bit of the stock in the mortar, stir, strain and pour back to the fish stock big pot.
Stir the stock, strain and pour in a clean pot and boil. This should be a soft boil to have ready when it needs to be added to the rice.
Back to the Paella, turn the heat to medium/high and add the rice to the paella (pan). Stir and make sure the rice gets all sofrito adhered to it. 4 people would be 400 grs. of rice (2 water glasses). Immediately after pour the fish stock into the pan – 5 glasses -(it should be boiling).
The heat should be high for the first 5 minutes. Stir only a bit. Then the following 10 minutes have at medium heat. When 10 minutes have gone through add the shrimps and prawns.

Keep your pot fish stock boiling just in case you need to add more.
Taste and add more salt if necessary. When the 15 minutes have passed decorate with the mussels and the crabs, turn heat off and pour the minced parsley on. Cover the paella outside the heat and wait for 5 minutes leaving it covered.
You could place it in the oven for the last 5 minutes instead, but again, that would be another interpretation, equally good and tasty… up to you!

Can you smell the sea in the dish? Viva Paella forever!!!
The rice grains should be loose, never a paste.

Saturday, March 15, 2014

Baklava-Enjoy


How to Make Baklava

COOKING LESSONS FROM THE KITCHN


How to Make Baklava
Baklava is one of those desserts that has a reputation for difficulty, but is actually surprisingly easy to make.  I suspect this is because working with phyllo dough always seems tricky, but if you follow a few very simple tips, it's really not — and the results are addictive. Read on for how to make a pan of sticky, sweet, buttery, flaky, nutty baklava!

How to Make Baklava
Baklava is a dessert of the Middle East and Mediterranean, and it has numerous variations depending on the country of origin.  Turkey, Syria, Lebanon, Greece, Jordan, Israel, Afghanistan, Georgia, Iran, Armenia and many other countries and regions all have a variation of this pastry, which is made with buttered layers of phyllo dough and ground nuts (usually pistachio, walnuts or almonds, or a combination) and covered in a sweet, often honeyed, syrup.  Other flavorings include cinnamon, cloves, rose water, cardamon, clove, and orange rind.
For this recipe, I used a mixture of walnuts and pistachios.  I like this flavor combination and the pretty green color that the pistachios bring.  For this same reason, I  garnish my baklava with chopped pistachios, but you can use walnuts as well.
The thing that most often scares people away from making baklava is handling the tissue paper-like sheets of phyllo.  It really isn't that difficult, if you remember a few simple tips:

Tips for Working with Phyllo

  • Defrost your phyllo dough in the refrigerator.  The night before you are going to make your baklava, put the package of phyllo dough in the refrigerator to defrost.  Do not try to use frozen phyllo — it will crack.
  • Unwrap it carefully.  The phyllo usually comes rolled up in plastic and should unwrap easily.  Leave the larger plastic sheet beneath it and try to unroll it in the place where you will be using it so you won't have to move it once it's laid out.
  • Cover with a dampened tea towel.  Dampen a cotton or linen tea towel and place it over the unrolled sheets. Important: Be sure the towel is wrung out very well.  If the towel is too damp, it will gum up the sheets.
  • Keep it covered.  Always replace the tea towel after you have removed a sheet of phyllo from the stack.
  • Handle gently.  Be gentle with the sheets of phyllo.  Keep the stack near your baking dish so you don't have to transport it very far once you lift a sheet off of the stack.
  • Rips and tears are OK.  Phyllo dough rips easily, but that's OK.  You are building up several layers of dough, so a rip or ragged edge here and there will be fine, and likely hidden within the baklava.  Even if your last piece tears a little, it will only contribute to the rustic, many-layered look of the dish.
  • Trimming the phyllo.  Phyllo comes in many sizes and a single sheet may not fit into your baking pan.  One option is to trim the phyllo to fit:  simply measure the inside of your pan and, using a scissors, cut the whole stack to fit.  I find that scissors are easier than a knife, which can pull and drag on the layers.
  • Trimming isn't always necessary.  Even if your sheets aren't a perfect fit to your pan, you can still use them without trimming.  Just fold them over to fit, being sure that you stagger the folds so you aren't creating extra layers in one place.  
  • Don't use a ton of butter.  You don't have to coat each layer completely with butter.  Just gently brush the butter on here and there without covering every inch of the surface.  Don't press really hard or you'll drag or tear the phyllo sheet.
You may notice that the measurements for the nuts in the recipe below are given in weight, not volume.  This is because the size of the nuts can vary wildly and therefore can really screw up a volume measurement. For example, a cup of whole walnuts will weigh less than a cup of walnut pieces simply because you can fit more pieces in cup.  The other important thing is to be sure that you have a very sharp knife.  The baklava should be cut before you bake it and recut again after baking to be sure all the pieces are separated. A sharp knife is crucial.  

Many recipes call for as much as one pound of butter to make baklava.  I find that somewhat shocking as I've never needed more that half that amount (two sticks) to make my baklava, and it it always comes out flaky and buttery.  It's not necessary to drench each layer of phyllo in butter.  Drizzling and dotting the butter will distribute it enough.

Rose water is a traditional flavoring for baklava.  I did not include it in the recipe below but it's easy enough to add if you enjoy its sweet, floral perfume.  Alton Brown has a nice trick where you put 1 teaspoon of rose water and 1/4 cup of water in a spritz bottle and then use it to mist the nut layers before starting with the next phyllo layers.

Finally, baklava is best after it has sat for a while, so it's perfectly fine to make it a day before you plan to serve it.  The recipe below makes about 28 squares, but you can get even more out of it if you cut the squares even smaller.  Remember, baklava is a rich pastry and most people only need a bite or two — though it is very addictive!  I was very grateful that my neighbors were in the middle of a renovation project so I could give away most of the pan of baklava I made for this post to their construction workers.  If I hadn't, there's no doubt that I would have eaten the entire pan, given a day or two.  It's that crazy-good!

How to Make Baklava

Makes approximately 28 pieces

What You Need

Ingredients
8 ounces walnuts
8 ounces plus 1/4 cup shelled pistachios
1/4 cup sugar
1 teaspoon cinnamon
2 sticks unsalted butter
1 package frozen phyllo sheets, thawed
For the syrup:
3/4 cup sugar
3/4 cup water
3/4 cup honey
Equipment
Kitchen scale
Food processor
Measuring cups and spoons
Medium-sized bowl
Clean tea towel
Sharp knife or kitchen scissors
9"x12"x2" baking pan
Pastry brush
2-quart sauce pan

Instructions

  1. Prep the filling.  Preheat the oven to 350°F.  Measure out 8 ounces of walnuts and 8 ounces of pistachios using a kitchen scale and place in the bowl of a food processor (reserve the additional 1/4 cup of pistachios for garnish). Add the sugar and cinnamon.  Pulse a few times to break up the nuts but do not chop them too fine or into a powder.  Transfer to a bowl.
  2. Melt the butter.  Place the two sticks of butter into the sauce pan and melt under low heat.  Keep an eye on things and turn off the burner when the sticks are nearly melted.  The rest will melt from the residual heat of the pan.
  3. Set up your assembly area.  Clear off a large surface, such as your kitchen table or counter.  Place the bowl of nut filling, the baking pan, the melted butter and the pastry brush on the surface, reserving a spot for the phyllo.
  4. Set up the phyllo.  Unwrap the phyllo sheets and carefully unroll onto the assembly surface, keeping the large sheet of plastic used to roll the sheets underneath.  Dampen the tea towel (not too wet!) and lay it over the phyllo.  
  5. Trim the phyllo (optional). If the phyllo dough is too big for your baking pan, trim the phyllo sheets to match the dimensions of your pan.  A scissors is the easiest way to do this.
  6. Lay the bottom layer.  Using the pastry brush, brush on a thin layer of butter all over the bottom of the baking pan.  Fold back the tea towel, carefully remove one sheet of phyllo dough and place it on the bottom of the pan.  Butter the top of the phyllo lightly, making sure you are going out all the way to the edges.  Repeat with layering 6 more sheets to total 7 sheets of phyllo, buttering the top of each sheet of phyllo before placing the next.  Be sure to re-cover the remaining phyllo with the tea towel each time you remove a sheet.
  7. Add the first layer of nuts.  Sprinkle half the nuts over the phyllo and spread them gently with your hand so that you have a fairly even layer.  Be sure to spread them all the way to the edges.
  8. Create another phyllo layer.  Place a sheet of phyllo on top of the nuts and carefully brush with melted butter.  Repeat, layering 4 more sheets in all, with butter between each layer.
  9. Add the second layer of nuts.  Sprinkle the remaining layer of nuts over the phyllo. Again, spread them into an even layer and push them all the way to the edges.
  10. Lay the top layer.  Pace a phyllo sheet on top of the nuts and brush lightly with butter.  Repeat, layering 6 more sheets of phyllo, with butter between each layer, to total 7 sheets.
  11. Cut the baklava.  Using a very sharp knife, cut the baklava on the diagonal into approximately 28 pieces (can be more if you make smaller pieces).
  12. Bake.  Place the pan of baklava in the oven and bake for about 45 minutes.  Check half way through and rotate the pan for even browning.  
  13. Chop the pistachios.  While the baklava is baking, finely chop the remaining 1/4 cup of pistachios and set aside.
  14. Remove the baklava from the oven and cool.  When the phyllo is evenly golden brown all over, remove the pan from the oven and set on a rack to cool.
  15. Make the syrup.  
    While the baklava is cooling, make the syrup.  Combine the sugar, water, and honey in a sauce pan and bring to a boil.  Boil for 10 minutes.
  16. Re-cut the baklava.  While the syrup is cooking, run your knife through the baklava to be sure the pieces are cut all the way through.
  17. Pour on the syrup.  When the syrup has boiled for 10 minutes, remove from the stove and carefully pour over the baklava, being sure to coat each piece.
  18. Garnish and serve!  Sprinkle some of the chopped pistachios on each of the baklava squares. Cover the baklava and let sit for several hours or overnight before serving.  Will keep for up to 5 days, covered.